Welcome to Dent Evo Advanced PDR Shop in Upland, where practical innovation meets real-world experience in the realm of Paintless Dent Removal (PDR). Today, I'm thrilled to introduce you to a transformative solution - The Adjust-A-Post PDR Pull Rack. This remarkable creation has revolutionized the way I approach auto body repair, and I'm eager to share its benefits with you.
Innovating out of Necessity
My journey began in the field as a mobile PDR technician, facing the everyday challenge of creating tension for efficient repairs. I improvised by strapping glue tabs to anything stationary, from trees to my vehicle, seeking the optimal angle for each job. It worked, but it was far from ideal.
As I transitioned my operations to Dent Evo's Advanced PDR Shop, the need for "tension pulls" became more prominent. Traditional solutions proved limiting; stationary posts were just that - stationary, and suction cups weren't reliable. I craved something stable, adjustable, and capable of multiple pulls from various angles. The Adjust-A-Post PDR Pull Rack was conceived out of necessity.
Harnessing the Power of Tension
Why tension, you ask? It's the linchpin of a cleaner, more efficient repair process. Unlike the traditional PDR method where technicians forcibly manipulate large metal areas using PDR rods or, believe it or not, sometimes even resort to hammer strikes from the inside of the panel - our approach is different.
We apply tension to the panel by attaching specially designed glue tabs to problematic areas and then securing these tabs to a ratchet strap or a “come-along” (aka winch puller). The other end of this setup is anchored to a stable object. This method allows us to move substantial sections of metal cleanly, without causing irreversible damage like kinks, high spots, or cracked paint.
But here's the magic: applying tension within the panel acts like tightening a drum skin. It stabilizes the thin sheet metal, making it more responsive to our movements, especially in the right direction. Pushing, pulling, prying, or even flattening high spots becomes incredibly effective because the metal is now stable and eager to regain its original shape. This phenomenon is particularly noticeable with steel, which tends to conform more efficiently under tension.
Advanced PDR: Beyond Door Dings
Let's clarify – what I practice isn't your everyday door ding PDR. It's advanced PDR, a significant choice for consumers. Why? Because it preserves the vehicle's original paint and condition, maintains resale/trade-in value, and significantly reduces repair time compared to traditional body and paint methods. Moreover, it's an eco-friendly solution, producing no waste and avoiding the use of harmful chemicals.
The Adjust-A-Post in Action
I've created a brief video to showcase the Adjust-A-Post PDR Pull Rack in action, and it's available within this blog post. Seeing the machine at work will give you a firsthand look at the difference it can make. This device is intended for professional use for PDR tension pulls and even light duty power pulls on vehicle sheet metal panels. It is not intended for use in frame straightening, although it was partly inspired by my use of such equipment with the PDR process.
DIY and Professional Use
Now, for the exciting part - I'm not keeping this innovation to myself. I'm offering plans for existing professional PDR and auto body technicians, as well as DIY enthusiasts, to build their Adjust-A-Post PDR Pull Rack. A detailed parts list with purchase links and schematics for optimal rack positioning are included here! While I encourage the DIY spirit, safety is paramount. Proceed with caution and at your own risk.
I've prepared a handy diagram to showcase the optimal positioning of each pull rack, simplifying the process of sliding your posts into position for attachment to the exact point you want to pull.

I’ve positioned my pull rack in a corner of my shop, but this system can be located in virtually any open area at a 90° angle. Remember, you will need enough space to pull a vehicle in from two different angles.
You might notice a slight difference between the line drawing schematic and what you saw in the video. When I initially installed the racks in my shop, I didn't realize that the left-side rack was too close to the other rack, limiting its use. I virtually lost about a foot and a half of post positioning within the rack, as it is too close to the other rack to be of use. By positioning each rack 13 inches away from the walls and each 'leading post' (the ones closest to where both walls meet) 34 inches from their respective walls, you'll be able to maximize the rack's usability with the vehicle parked in the bay. This will allow you to perform both perpendicular as well as lateral pulls simultaneously as needed! The two racks positioned properly will allow you to position a typical sized vehicle into the corner from either direction, and either head in or backed in, whichever half of the vehicle is in need of repair. Technically, you can even mount the strut channels on the wall instead of on posts, however I like to be able to walk behind the pull posts while straps are in place and under tension, so I’m not having to crawl under or climb over the straps or cables as I work from multiple sides of the work area. Also the extra space behind each rack can serve as some additional storage space if needed.
Each rack is built from two 10-foot lengths of 12-gauge strut channel, 'U-bolted' to two 5-foot-tall, 2-inch-wide fence posts with welded flanges at the bottom. Please keep in mind that wider posts can be used in place of these two inch ones and even encouraged, but I have found this setup to be more than capable for my pulling needs. To each rack, I've attached a 5-foot length of 14-gauge strut channel using two strut channel trolleys. Most of these supplies can be found at your local hardware store (while supplies last), except for the trolleys, which are available on Amazon. These trolleys were originally designed for overhead use for electric hoists, so when used sideways as I'm doing on the pull rack system, they don't roll as smoothly as when mounted differently. I'm actively working on improving that for a future update.

These strut channel trollies were originally intended for overhead use for mounting electric hoists, but they are heavy duty and work well for this application!
For drilling into the concrete floor to install the sleeve anchors that secure the posts, I recommend using a commercial-grade Roto Hammer, which you may be able to rent from a local equipment rental company.
Materials You'll Need:
- Four 5-foot tall, 2-inch wide fence posts with welded flanges at the bottom.
- Four 10-foot lengths of 12-gauge strut channel.
- Two 5-foot lengths of 14-gauge strut channel.
- Four strut channel trolleys.
- 16 Sleeve anchors for concrete floor installation.
- Eight U Bolts for fastening the 12 gauge strut channels to the 2 inch posts.
- Nuts and bolts for fastening the 5-foot long 14-gauge strut channel to the trolleys.
- Ratchet straps; virtually any ratchet strap will do.
* I will be experimenting with different equipment and update you on my findings!
- Come-along (AKA winch puller)
-Optional; various heavy duty carabiners and chain. this will allow more mounting options for your straps or cables especially when pulling from the trolley mounts of the posts.
Tools you will need:
-Roto Hammer with Masonry Bits
-Small Sledge Hammer for tapping sleeve anchors into concrete floor.
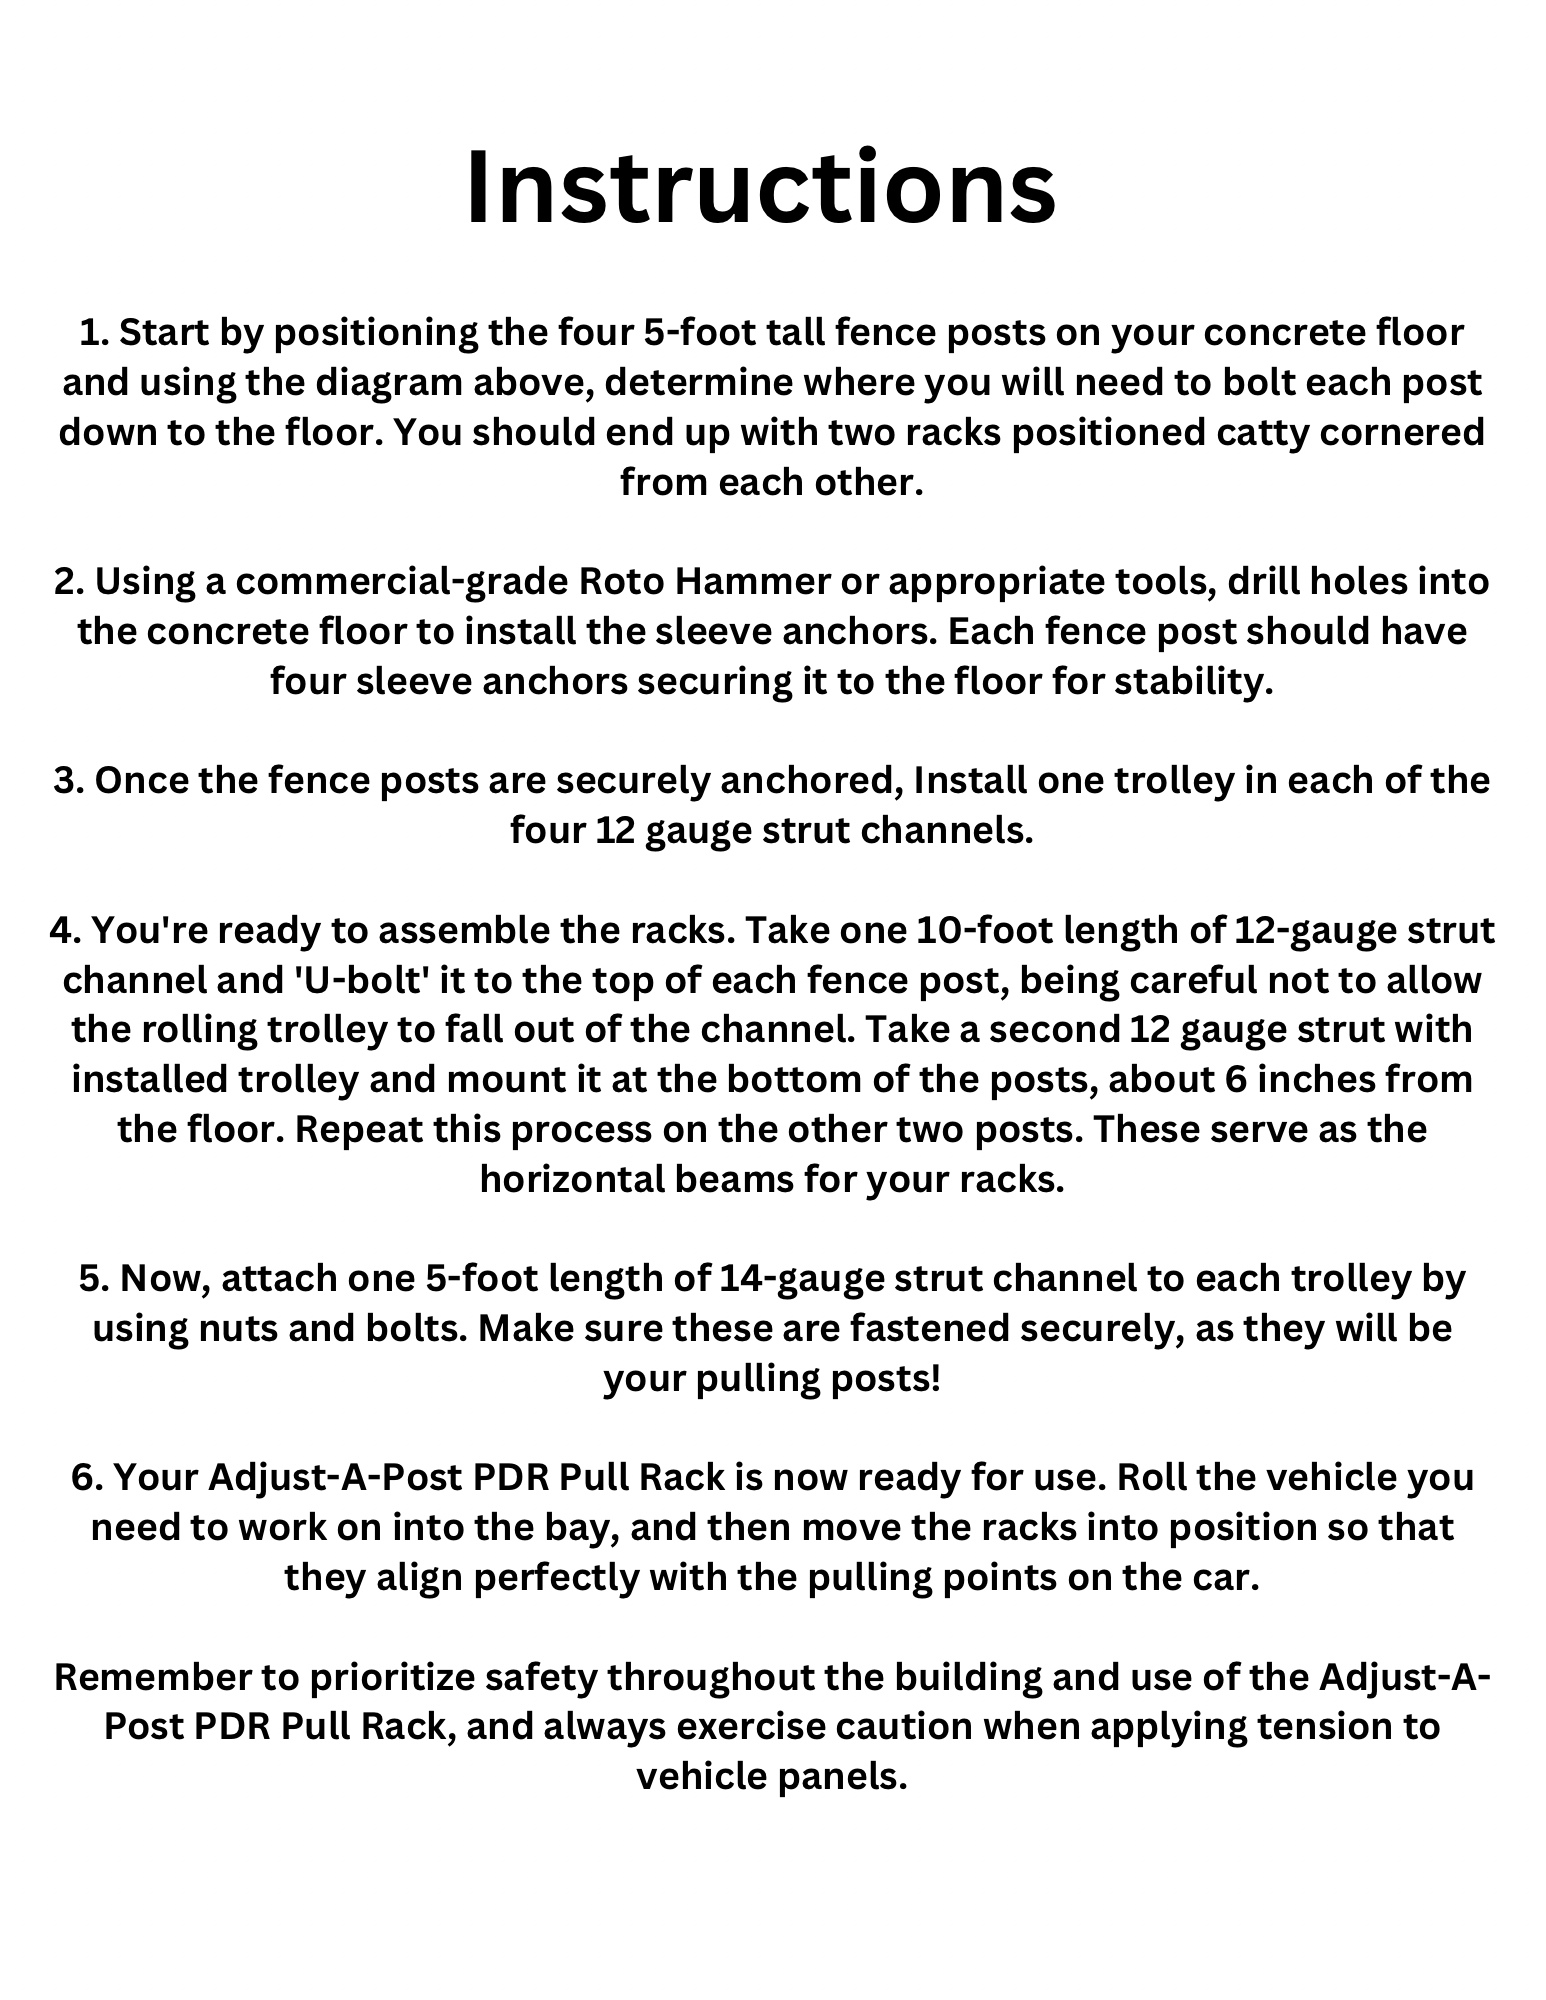
Remember to prioritize safety throughout the building and use of the Adjust-A-Post PDR Pull Rack, and always exercise caution when applying tension to vehicle panels. Unlike conventional auto body repair where tabs are being welded to the vehicle and/or frame, with glue and PDR tension pulls and power pulls, your weakest link is going to be the glue and the paint on the vehicle itself, as well as any material (bondo) that is between the paint and the vehicle panel. So keep this in mind when pulling. As mentioned before, use at your own risk, as items can go flying, striking you as the user or others who are within the impact zone. Understand that the pull rack system bay is a dangerous place to be in while the panel is under tension. So please use caution at all times! A towel or blanket hung over the strap or cable, nearest the vehicle, while it is under tension can be used as a weight so that when the glue tab releases, it can readily fall to the floor instead of becoming a dangerous projectile.
If you have any questions or need further guidance, don't hesitate to reach out to me here on Dent Evo Blog. Your success with this setup is important to me!
Embracing Progress
At Dent Evo, I'm committed to staying on the cutting edge of the auto body and collision repair industry. My approach is all about constant evolution, and the Adjust-A-Post PDR Pull Rack is a prime example of my dedication to innovation. With this machine and other advanced tools, I'm pushing the boundaries of what's possible in auto body repair.
In conclusion, the Adjust-A-Post PDR Pull Rack isn't just a tool; it's a reflection of my unwavering commitment to delivering top-notch auto body repair services. I invite you to join me in exploring the world of advanced PDR, whether you're a consumer looking for top-tier repairs or a fellow technician eager to embrace a more efficient, eco-friendly approach. Together, we're reshaping the industry, one dent at a time.
Stay curious, stay safe, and explore the possibilities. Auto body repair is evolving, and I'm thrilled to be leading the way.
Thanks for reading!
-Joe